Blogger is not loading in Internet Explorer properly. Blogger loads much faster in Google chrome.

Showing posts with label Diy Projects. Show all posts

Tuesday, October 30, 2012

Orange Upcycled, Re purposed Table Stand

Another fun piece to re purpose! Sanded it lightly. Painted it with 3 coats of primer and four coats of spray paint sanding in between 1st and 2nd coat. Primed and painted the metal handles.
I love it!

Photos by Christine Zeller

Monday, October 1, 2012

Vintage Atomic Re purposed Table Tray Stand

I found this in my travels. What a fun 50's atomic piece. I up cycled, re purposed it in black and white to go with any decor. Has the original ashtray but would look great with any cool bowl and used as a candy dish. Can be seen here!


Monday, March 5, 2012

Adding and Addition onto our House Part 3


Well it's been a busy couple of weeks but the addition on the back of our house is pretty much done. Just a few minor things left and of coarse clean up, dust and debris.
The right side is the garage addition which will be pretty convenient for a packing area for my Etsy shops.

Here is a photo of the inside where the glass doors are. 
We didn't cover over the brick wall that use to be the outside. I think it gives it a nice rustic look.


A few DIY Tips - The wide wood around where the old door way was has to be stained. The sides I will use a small brush as not to get it on the white molding but the wide wood part I will use a white cloth to put the stain on. It seems to go on more even with a cloth.

Calking Tip - Make sure you cut the opening to your calk tube on a slant and not to big,. Cut it about the size cracks you will be filling. When calking the trim around the windows and baseboards. Run a bead of calk all along the baseboard top and wet your finger and run it along the the calk it blends it in well and gives it a nice finish look.


Thanks for visiting!


Saturday, February 25, 2012

Adding an Addition onto our House Part 2

Moving right along with the addition.


Our home addition is coming along. This is about 2 weeks into it. The sheet rock is up. Taping is done and second coat of plaster is on. We were hoping to have the garage door in by today but the company that we bought it from broke it on the way here Friday so we will be receiving a new one Monday..
My husband is working on moving the sliding glass doors from the living area to the front of the new part today. I will share the pix this coming week..

Tips for plastering walls - 3 light coats of plaster, starting with 4" taping knife using larger one for each coat. Scrape each coat with edge of plaster knife, final coat sand/ feather edge with pole sander and non electric hand sander 120 grit mesh dry wall paper.

Most important avoid access plaster on coats...


Thanks for visiting!


Monday, February 20, 2012

Adding an Addition onto our House


Part of the concrete floor had to be jack hammered up and a new slab poured. Not my husbands favorite material to work with. Dusty and messy..


Hi All
We decided to build an addition on the downstairs part of our house. A few years back we closed in part of the porch upstairs. But this addition will extend the garage and living space downstairs. My husband is a carpenter/contractor so we have always enjoyed updating and added extra living space to our homes we have lived it.  I haven't always taken photos of ever project but I wish I did. So this one I am getting photos of.

Years ago we use to live in the house while working on it but it makes such a mess, so over the years we have managed to get most work done before we moved it. That is what is nice about this addition. Most of the work will be done before we move the existing sliding glass doors out to the new framed area so most of the dust and mess is staying out of the house.  The extra garage space which will be 12 x 14 is going to work perfect for a packing area as we have quite a bit of packing now with my CoolStuffArtGallery shop and my TheVintageBirds shop. The living area which will be 12 x 10 will give a good view over to the horse barn which wasn't there before.

The photo below, the top photo was where the addition was on Friday and the second was the end of the next day Saturday. My husband frames fast. :-)
My son is twelve and a big helper and is learning a lot about this trade..

Any rehab/addition tips I can gather out of my husband along the way I will share..

1st tip - Put the water in the cement mixer first then the concrete mix, the other way it makes a big ball and doesn't mix well..

Thanks for visiting!


Wednesday, November 16, 2011

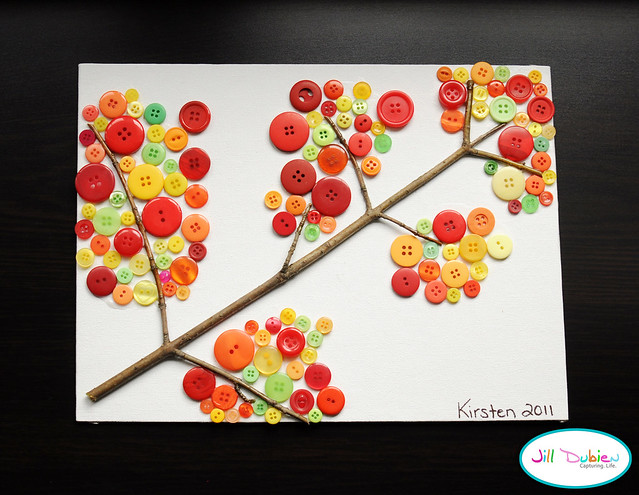
Fall Tree Button Art Project


Don't know what to do with extra buttons you have lying around. Well here is a creative fun art project for the kids this fall. For instructions head on over to Meet the Dubiens
ENJOY!


Monday, November 14, 2011

Soft Fabric Pumkin Art Project for Fall


OK! These are just to cute! I love them, How Fun... Pumkin Squash Softies.. Made from fake fur, fleece or other fabrics and stuffed with plastic shopping bags. Head on over to oh, how posh! for the instructions on how to make them.
ENJOY!


Thanksgiving Toothpick Flag Printables

Thanksgiving Printable's

I love the colors and patterns on these fun printable Thanksgiving toothpick flags. For instructions head on over to Simple as that  to print.  ENJOY!


Monday, November 7, 2011

Fall Leaves Art Project DIY

Amazing, easy art project from leaves you find out your DOOR!. Instructions at Sunset
I didn't know you could photocopy leaves . How FUN!


Wednesday, October 19, 2011

Bean Mosaic Art Project


What a great art project for kids or adults. I really love this bean mosaic on canvas. Think of all the different designs you could make. For step by step instructions go to Martha Stewart


Monday, October 17, 2011

Gerbera Daisy Cube Fall Art Project


I love this fun and easy fall art project Gerbera daisy cube by Diane Flowers. For instructions visit saveoncrafts


Related Posts Plugin for WordPress, Blogger...